Guide:Using The TideCloak SPA Testing Application
This guide will walk you through using the TideCloak-integrated Single-Page Application (SPA) for testing user authentication and session management.
This guide will walk you through using the TideCloak-integrated Single-Page Application (SPA) for testing user authentication and session management.
Prerequisites
Before you begin, ensure that you have:
- A TideCloak instance running locally or on a server.
- A realm and a client configured in TideCloak.
- Basic knowledge of HTML and JavaScript.
1: Set Up TideCloak and Tide IDP
Before starting to use the SPA testing application, make sure you have both TideCloak and the TIDE Identity Provider (IDP) set up and running. This is critical for managing user authentication.
You can refer to the following setup guides to ensure your environment is ready:
- How to Set Up TideCloak: This guide walks you through configuring TideCloak with the necessary values (e.g.,
localhost:8080for local environments). - How to Set Up the TIDE IDP: This guide helps you configure the TIDE Identity Provider, which serves as your authentication server.
By following these setup guides, you will ensure that TideCloak and TIDE IDP are running and configured correctly, allowing you to integrate with your testing application.
Step-by-Step Instructions
1. Open the Testing Application
Open the application in your browser. If hosted locally, you can access it at https://test.tidecloak.com/.
You will be greeted with a form where you can configure TideCloak settings. The form looks like this:
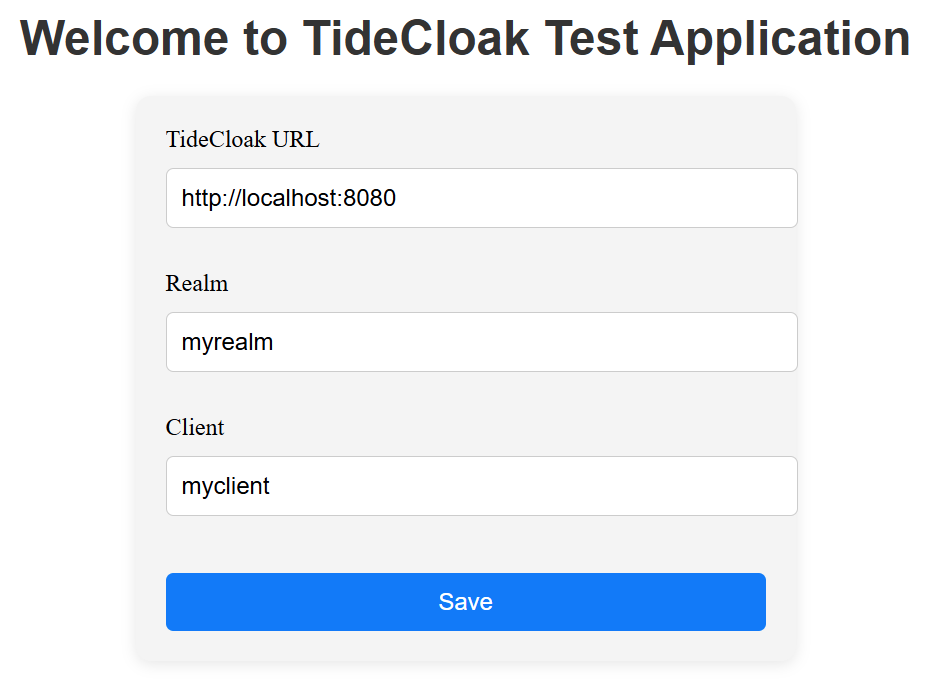
2. Enter TideCloak Configuration Details
Fill out the following fields to connect the application to your TideCloak server:
- TideCloak URL : The base URL of your TideCloak server (e.g.,
http://localhost:8080for local setups). - Realm : The realm you want to use for authentication within TideCloak (e.g.,
myrealm). - Client : The client ID that your application uses for TideCloak authentication (e.g.,
myclient).
3. Click Save to Initialize TideCloak
Once the configuration details are entered, click the Save button. This initializes the TideCloak connection for the SPA:
- The form will be hidden.
- Buttons for logging in and out will appear.

4. Sign In with TideCloak
After TideCloak is initialized, a Sign in button will be shown:
- Click the Sign in button to initiate the TideCloak login process.
- You will be redirected to the TideCloak login page, where you will provide your username and password.
- After successful authentication, you will be redirected back to the application.
5. View User Name After Login
Once logged in, the application will fetch and display the name of the logged-in user provided by TideCloak. This will appear as a welcome message at the bottom of the page.
For example:

This helps verify that the user has logged in successfully, and you can test how your application will handle and display authenticated user data.
6. Log Out
After logging in, a Sign Out button will appear:
- Click the Sign Out button to log out of TideCloak.
- You will be redirected back to the application, and the Sign in button will be displayed again.
7. Clear Configuration
To reset the current TideCloak configuration or test with different settings:
- Click the Clear config button.
- This will reset the form and allow you to enter new TideCloak settings.
8. Testing the Application
To test the SPA with TideCloak in various environments:
- Ensure your TideCloak instance is running (locally or remotely).
- Make sure the correct URL , realm , and client ID are provided.
- Test logging in and out multiple times to verify that session management works as expected.